Go is the simplest language I've ever seen!

Image Resizer 를 다른 언어가 아닌 Golang 으로 하는 이유는 Go lang 은 컴파일 빌드시 Executable File(실행 가능한 파일)이 바로 튀어나오므로, 사실상 위와같이 주로 실행시켜 만드는 Utilities 를 만들기에 상당히 심플합니다.
설계
대략적인 어플리케이션의 구상도는 아래와 같습니다.

사용자가 CLI 를 통해 우리가 Go lang 으로 만든 어플리케이션에게 요청을 보내면 Go lang 이 내부 Standard Library 를 이용해 맞는 Encoder / Decoder 를 찾아 요구하는 사양을 갖춘 새로운 이미지의 형태로 이미지를 생성하여 클라이언트에게 돌려주는 형식입니다.
일단 요구사항을 보았을때 해야할 작업은 클라이언트가 입력해야 할 Arguments 를 정의하는 것입니다. 정의는 아래와 같습니다.
Arguments 정의
Arguments 로 InputFileName, outputFileName 을 받고 width, height 을 받을 예정입니다. Arguments 를 CLI 에 입력하는 형태는 아래와 같습니다.
./resizer -i input.jpeg -o out.jpeg --w 200 -h 300이제 정의도 대략적으로 되었으니 어플리케이션을 함께 구현해보도록 하겠습니다.
구현
Golang 에서 사용자 입력을 위에서 정의한 것처럼 Flag 에 따라 받기 위해서는 Standard Library 에 있는 `flag` 를 쓰면 상당히 쉽게 구현이 가능합니다. 오늘 구현에서는 서두에 언급한 것과 같이 TDD 를 통해 구현해보도록 하겠습니다.
일단 간단하게 적어본 요구사항은 아래와 같습니다.
- 사용자가 InputFileName 을 입력하지 않을 시 "you must write the input file name" 에러를 리턴한다.
- 사용자가 outputFileName 을 입력하지 않을 시 "you must write the output file name" 에러를 리턴한다.
- 사용자가 width 를 입력하지 않을시 "you must write the width of the resized image" 에러를 리턴한다.
- 사용자가 height 를 입력하지 않을시 "you must write the height of the resized image" 에러를 리턴한다.
위에 맞게 저희가 검증해야 할 로직들만 간단하게 테스트 코드로 작성해보도록 합시다.
package main

import (
	"testing"
)

func ShouldPanicWith(message string, f func() error, t *testing.T) {
	defer func() {
		err := recover().(error)

		if err.Error() != message {
			t.Fatalf("Wrong panic message: %s", err.Error())
		}
	}()
	f()
}

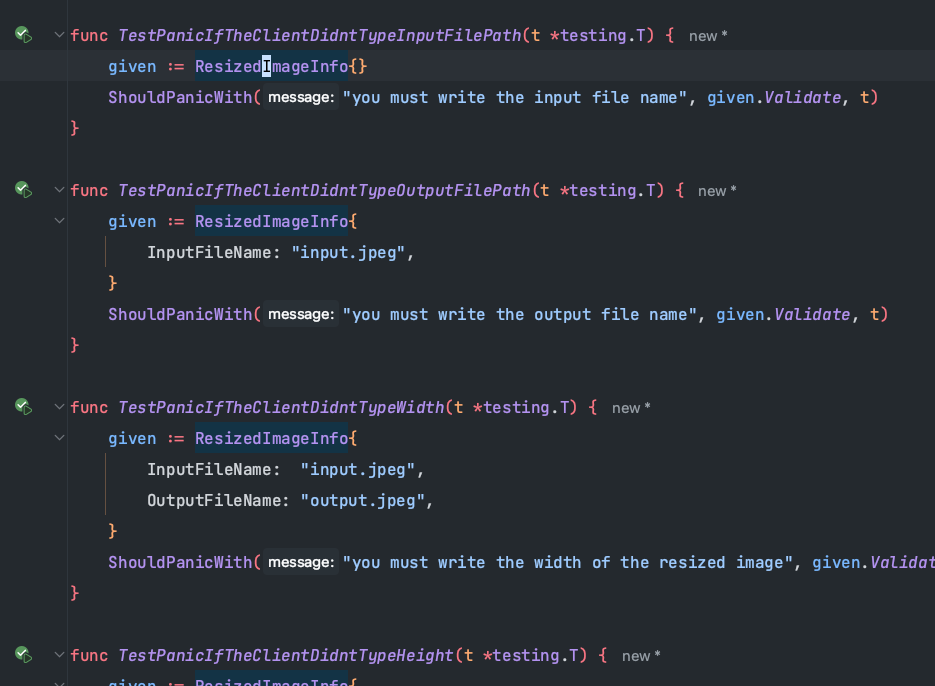
func TestPanicIfTheClientDidntTypeInputFilePath(t *testing.T) {
	given := ResizedImageInfo{}
	ShouldPanicWith("you must write the input file name", given.Validate, t)
}

func TestPanicIfTheClientDidntTypeOutputFilePath(t *testing.T) {
	given := ResizedImageInfo{
		InputFileName: "input.jpeg",
	}
	ShouldPanicWith("you must write the output file name", given.Validate, t)
}

func TestPanicIfTheClientDidntTypeWidth(t *testing.T) {
	given := ResizedImageInfo{
		InputFileName:  "input.jpeg",
		OutputFileName: "output.jpeg",
	}
	ShouldPanicWith("you must write the width of the resized image", given.Validate, t)
}

func TestPanicIfTheClientDidntTypeHeight(t *testing.T) {
	given := ResizedImageInfo{
		InputFileName:  "input.jpeg",
		OutputFileName: "output.jpeg",
		Width:          300,
	}
	ShouldPanicWith("you must write the height of the resized image", given.Validate, t)
}
`parse_test.go` 에는 위와 같이 코드가 입력되고 실제로 실행해 봐도 아래와 같이 실패하는 결과값을 가지게 됩니다.

이제 하나 하나씩 우리가 검증해야 할 테스트를 통과할 수 있도록 코드를 구현해보도록 합시다. 일단 우리가 클라이언트로 부터 받은 값들을 담을 구조체 형태는 아래와 같습니다.
package main

type ResizedImageInfo struct {
	InputFileName  string
	OutputFileName string
	Width          int
	Height         int
}

func (r *ResizedImageInfo) Validate() error {
	return nil
}
이제 저 Validate 로직속에 검증할 로직들을 하나씩 넣어보도록 합시다. 너무 세세하게 하면 길어지므로 전부 다 작성한 뒤 테스트를 통과하는 코드만 적도록 일단 하겠습니다.
package main

import "fmt"

type ResizedImageInfo struct {
	InputFileName  string
	OutputFileName string
	Width          int
	Height         int
}

func (r *ResizedImageInfo) Validate() error {
	if r.InputFileName == "" {
		panic(fmt.Errorf("you must write the input file name"))
	}
	if r.OutputFileName == "" {
		panic(fmt.Errorf("you must write the output file name"))
	}
	if r.Width == 0 {
		panic(fmt.Errorf("you must write the width of the resized image"))
	}
	if r.Height == 0 {
		panic(fmt.Errorf("you must write the height of the resized image"))
	}
	return nil
}
이렇게 코드를 적어주고 나면 아래와 같이 테스트가 모두 통과되는 것을 확인할 수 있습니다. 일단, 위의 테스를 통해서 우리가 최소한으로 검증하고자 하는 로직이 통과됬음을 알 수 있습니다. (확장자와 같은 것들은 추후에 입맛에 맞게 추가하면 될거 같습니다)

이제 다음으로 해야할 작업은 스탠다드 라이브러리인 Flag 를 이용해 저희가 구현한 구조체에 값을 넣어주는 일입니다.
func main() {
	inputFile := flag.String("i", "", "input file name")
	outputFile := flag.String("o", "", "output file name")
	width := flag.Int("w", 300, "width for resized image")
	height := flag.Int("h", 300, "height for resized image")
	flag.Parse()
}
이제 image Resize 로직을 구현해보도록 하겠습니다. 사실 이 부분은 복잡하게 들어가면 너무 어려워져서 간단하게 설명만 하고 넘어가겠습니다. 일단 Image 를 Resize 할때 우리가 적용할 방식은 새로운 크기의 파레트를 만들고, 새롭게 만든 파레트에 기존 이미지를 그리는 방법을 이용하게 됩니다. 그래서 Go lang 의 Standard library 중 하나인 image/draw 패키지를 이용할 것 입니다.
- 참고: https://go.dev/blog/image-draw
The Go image/draw package - The Go Programming Language
The Go image/draw package Nigel Tao 29 September 2011 Introduction Package image/draw defines only one operation: drawing a source image onto a destination image, through an optional mask image. This one operation is surprisingly versatile and can perform
go.dev
그래서 기본적으로 우리가 체크해야 할 내용은 다음과 같습니다. 현재 input 으로 입력받은 파일이 잘 존재하지 않는다면 에러를 내뱉는 로직을 작성해볼 수 있습니다. 그리고 최종적으로는 우리가 작성한 파일의 Image 가 잘 수정되었는지 테스트 해볼수도 있겠죠?
일단 위 요구사항 중 파일을 여는 로직에 대한 테스트를 작성해보겠습니다.
package resize

import (
	"goresize/parse"
	"image"
	"testing"
)

func shouldPanicWith(message string, f func(file string) *image.Image, filePath string, t *testing.T) {
	defer func() {
		err := recover().(error)

		if err.Error() != message {
			t.Fatalf("Wrong panic message: %s", err.Error())
		}
	}()
	f(filePath)
}

func TestPanicIfThereIsNoFileInTheGivenFilePath(t *testing.T) {
	given := parse.ResizedImageInfo{
		InputFileName:  "test-input.jpeg",
		OutputFileName: "test.jpeg",
		Width:          300,
		Height:         300,
	}

	shouldPanicWith("there is no image file in the given filepath", OpenImageFile, given.InputFileName, t)
}

func TestTheInputFilePathExistence(t *testing.T) {
	given := parse.ResizedImageInfo{
		InputFileName:  "test-input.jpeg",
		OutputFileName: "test.jpeg",
		Width:          300,
		Height:         300,
	}

	testImage := OpenImageFile(given.InputFileName)

	if testImage == nil {
		t.Fatal("there is no image file given filepath : ", given.InputFileName)
	}
}
이미지 파일을 위와 같이 여는 로직을 작성하면 아직 파일을 여는 로직 등이 없으므로 당연히 테스트가 실패하는데요. 이제 테스트 로직에 맞게 파일을 열고 닫는 로직을 작성해보도록 하겠습니다. 없을시 에러를 panic 하는 동작을 넣도록 하겠습니다.
// OpenImageFile You must close given file when you finished the logic
func OpenImageFile(filePath string) *os.File {
	// Open the input image file.
	inputFile, err := os.Open(filePath)
	if err != nil {
		panic(fmt.Errorf("there is no image file in the given filepath"))
	}
	return inputFile
}
이제 테스트를 위해 돌려보면 첫번째 예외 상황 테스트는 성공하지만 두번째 테스트는 진짜 파일이 없어서 실패하는데요. 여기서 Mocking 을 써서 로직을 격리 시켜도 되지만, 일단은 파일을 만들고 테스트가 종료되면 지우는 방향으로 아래와 같이 코드를 수정하도록 하겠습니다.
func TestTheInputFilePathExistence(t *testing.T) {
	given := parse.ResizedImageInfo{
		InputFileName:  "test-input.jpeg",
		OutputFileName: "test.jpeg",
		Width:          300,
		Height:         300,
	}
	os.Create(given.InputFileName)
	defer os.Remove(given.InputFileName)

	testImage := OpenImageFile(given.InputFileName)

	if testImage == nil {
		t.Fatal("there is no image file given filepath : ", given.InputFileName)
	}
}
위와 같이 로직을 작성해보면 성공하는 것을 확인할 수 있습니다.
이제 우리가 올린 이미지 파일을 디코드 하는 로직을 작성해보도록 하겠습니다. 디코드 하는 로직은 사실 크게 유효성 검증을 지금은 하지 않겠습니다. 기본적으로 Image 파일이 아닐때 오류를 내는지, 정상적인 케이스에서 잘 디코드가 되는지만 테스트를 해보겠습니다.
package image

import (
	"os"
	"testing"
)

// normal case
func TestDecodeFileToImage(t *testing.T) {
	imageForTest := OpenImageFile("test.jpeg")

	// shouldn't return error
	if _, err := DecodeFileToImage(imageForTest); err != nil {
		t.Fatalf("you must check the decode logic : %+v\n", err.Error())
	}
}

func TestDecodeNotImageFile(t *testing.T) {
	os.Create("test.txt")

	imageForTest := OpenImageFile("test.txt")

	defer os.Remove("test.txt")

	decodedImage, err := DecodeFileToImage(imageForTest)

	if decodedImage != nil && err == nil {
		t.Fatalf("text file was decoded as well... you should check the logic")
	}
}
위와 같이 테스트 코드를 작성하고 돌리면 당연하게도 아무 로직이 없으니 실패하게 됩니다. 이제 테스트 조건에 맞게 로직을 아래와 같이 작성해 봅시다.
func DecodeFileToImage(f *os.File) (image.Image, error) {
	// Decode the input image.
	img, _, err := image.Decode(f)
	if err != nil {
		return nil, err
	}
	return img, nil
}
위와 같이 작성한뒤 실제 jpeg 파일을 아래와 같이 폴더에 추가한뒤 테스트를 실행해보면 "txt" 파일을 디코드 하는 테스트는 에러를 잘 리턴하며 성공하지만, 정상적인 케이스의 테스트가 "you must check the decode logic : image: unknown format" 에러와 함께 성공하지 않는것을 확인할 수 있습니다.
그 이유는 Go language 의 스탠다드 라이브러리인 Image decode 로직의 주석을 잘 보면 알 수 있는데요.
Decode decodes an image that has been encoded in a registered format. The string returned is the format name used during format registration. Format registration is typically done by an init function in the codec-specific package.
위와 같이 이미지 포맷 등록 절차의 경우 구체적인 codec 의 Init function 이 실행될때 등록된다고 나옵니다. 따라서, 현재 package 에서 go 의 standard package 중 하나인 jpeg package 를 import 해야 합니다.
import (
	"fmt"
	"image"
	_ "image/jpeg"
	"os"
)
위 처럼 작성후 테스트를 해보면 로직이 테스트를 잘 통과함을 확인할 수 있습니다. 이제 Main 에서 함수를 작성하면 아래와 같이 쓸 수 있습니다.
func main() {
	inputFile := flag.String("i", "", "input file name")
	outputFile := flag.String("o", "", "output file name")
	width := flag.Int("w", 300, "width for resized image")
	height := flag.Int("h", 300, "height for resized image")
	flag.Parse()

	information := &parse.ResizedImageInfo{
		Width:          *width,
		Height:         *height,
		InputFileName:  *inputFile,
		OutputFileName: *outputFile,
	}

	imageFile := image2.OpenImageFile(information.InputFileName)
	decodedImage, err := image2.DecodeFileToImage(imageFile)
}
이제 해야할 기능은 새롭게 Image 파일을 만들고, 그 위에 기존 이미지 픽셀을 그려주는 것인데요. 그리는 것에 대한 테스트는 조금 까다로우므로 생성하려는 이미지의 크기가 우리가 제공하는 크기에 맞게 잘 생성되는지 테스트 해보도록 하겠습니다.
func TestResizeImageToGivenWidthAndHeight(t *testing.T) {
	width, height := 300, 30
	imageForTest := image.OpenImageFile("test.jpeg")
	decodedImage, _ := image.DecodeFileToImage(imageForTest)
	newImage := image.NewImageFrom(decodedImage, width, height)
	rect := newImage.Bounds()

	if rect.Max.X != width || rect.Max.Y != height {
		t.Fatalf("the resized image size is difference from your given information %+v\n", rect)
	}
}
이제 위에 맞는 로직을 작성해보도록 하겠습니다.
func NewImageFrom(img image.Image, width, height int) image.Image {
	// Create a new image with the desired dimensions.
	newImg := image.NewRGBA(image.Rect(0, 0, width, height))

	// Use the Draw function to resize the image.
	draw.CatmullRom.Scale(newImg, newImg.Bounds(), img, img.Bounds(), draw.Over, nil)

	return newImg
}
위 로직이 작성한 후 테스트를 돌려보면 통과하는 것을 확인할 수 있습니다. 일단은 그리는 것은 테스트 하기에는 지금 너무 길어질거 같아서 한번에 작성하였습니다.
마지막으로 이제 해야할 것은 파일을 생성한 뒤에 새로운 파일을 Jpeg 파일로 Encode 하는 것 입니다. 아래와 같이 테스트 코드를 먼져 작성해보도록 하겠습니다.
func TestEncodeNormalFileToImageFile(t *testing.T) {
	given := parse.ResizedImageInfo{
		InputFileName:  "test.jpeg",
		OutputFileName: "test-output.jpeg",
		Width:          300,
		Height:         30,
	}
	imageForTest := image.OpenImageFile(given.InputFileName)
	defer imageForTest.Close()
	decodedImage, _ := image.DecodeFileToImage(imageForTest)
	newImage := image.NewImageFrom(decodedImage, given.Width, given.Height)
	outputFile, err := image.EncodeImageFile(newImage, &given)
	defer os.Remove(outputFile.Name())
	defer outputFile.Close()

	if err != nil {
		t.Fatalf("error : %+v\n", err)
	}

	if outputFile.Name() != given.OutputFileName {
		t.Fatal("The file was not created successfully.")
	}
이제 테스트가 완성됬으니 테스트에 맞게 로직을 작성해봅시다.
// EncodeImageFile You must close the output file
func EncodeImageFile(resizedImage image.Image, r *parse.ResizedImageInfo) (f *os.File, err error) {
	// Create the output image file.
	outputFile, err := os.Create(r.OutputFileName)
	if err != nil {
		return nil, err
	}

	// Encode the resized image as JPEG.
	err = jpeg.Encode(outputFile, resizedImage, nil)
	if err != nil {
		return nil, err
	}

	return outputFile, nil
}
이제 완성 실제로 이제 잘 동작하는지 테스트를 해봐야 할 차례인데요. 이제 테스트는 잘 통과하니 Main Logic 에서 코드를 전부 합쳐주도록 합시다.
package main

import (
	"flag"
	"fmt"
	image2 "goresize/image"
	"goresize/parse"
	"log"
)

func main() {
	inputFile := flag.String("i", "", "input file name")
	outputFile := flag.String("o", "", "output file name")
	width := flag.Int("w", 300, "width for resized image")
	height := flag.Int("h", 300, "height for resized image")
	flag.Parse()

	information := &parse.ResizedImageInfo{
		Width:          *width,
		Height:         *height,
		InputFileName:  *inputFile,
		OutputFileName: *outputFile,
	}

	imageFile := image2.OpenImageFile(information.InputFileName)
	defer imageFile.Close()
	decodedImage, err := image2.DecodeFileToImage(imageFile)
	resizedImage := image2.NewImageFrom(decodedImage, information.Width, information.Height)
	resizedFile, err := image2.EncodeImageFile(resizedImage, information)
	resizedFile.Close()

	if err != nil {
		log.Fatal(err)
	}

	fmt.Println("Image resized successfully!")
}
이제 아래 커맨드를 입력해 봅시다.
go build -o resizer

./resizer -i input.jpeg -o out.jpeg --w 200 -h 300
아래 사진과 같이 찌그러진 이미지가 잘 생성됬음을 확인할 수 있습니다.

끝마치며
사실 더 정교하고, 체계적으로 TDD 를 해야 하지만.. 약간의 귀찮음과 시간이 오래 걸림으로 인해 포스팅에서 약간은 생략한 부분들이 있는데요. 목적자체가 Go lang 에서 Image Resizer 를 구현하기 위함이라고 생각해주셨으면 감사하겠습니다 :).
전체 코드 내용은 아래 Repository 에 있습니다!
https://github.com/tmdgusya/goresize
GitHub - tmdgusya/goresize: Resizing your image with Go!
Resizing your image with Go! Contribute to tmdgusya/goresize development by creating an account on GitHub.
github.com
'Go' 카테고리의 다른 글
| 만들면서 배우는 Https 서버 시리즈 2 (3) | 2024.11.07 |
|---|---|
| 만들면서 배우는 Https 서버 시리즈 1 (11) | 2024.11.06 |
| Go lang 으로 Binary Tree 만든 코드 (0) | 2022.08.07 |
| Go 기초 - 1) Go 의 모듈구조 및 변수 (0) | 2022.06.19 |